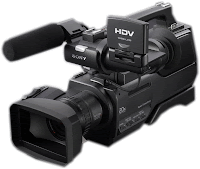
The big leap that I had to take in my learning was moving from a simple Sony HD USB flip camera straight to a Sony HDV 1000 professional tape camera. From the pictures on the left it is pretty obvious to tell which one is the professional one.
The advantage with the Sony HDV 1000 was that due to its size and design it could be mounted on your shoulder to give a much more steady shot when moving rather than the flip camera where you would need time to constantly remove and put on a tripod if you have different types of shots. This was especially helpful in the walking part of the scene giving a "bopping" affect meaning the viewer could relate with the characters personality much easily.
The disadvantage to the professional camera was that it took much longer to process the film onto the computer via a special cable and this took away some of our editing time but in return we got a much more high quality footage. Whereas with the flip camera it would of only taken a simple usb connection to move all the files onto the computer. Also, with the Sony HDV 1000 we were able to manually focus onto specific things which can be noticed at 1.15 to 1.19 minutes in our opening scene, this is where the background is slightly blurred therefore allowing the audience to focus more on Damiens face
 |
| Michael with incorrect colour correction |
 |
| Michael with correct colour correction |
Using Final Cut Pro was a real challenge, however after some assistance from people who were familiar with it I mastered the art of editing and was able to experiment with certain types of video effects. Colour correction was very important in the movie because we wanted to put a layer over the real image to make it seem professional and not like it was filmed from a normal camera.
Both of the top pictures are taken from the same part of the opening scene, however the first one picture with incorrect colour correction is from the first draft. This had to be changed to what it was in the second picture which is taken from the final draft. Because of Michaels dark skin colour it was hard to keep the dark gloomy look of the picture without his face being hardly visible. So in order to keep this effect I had to experiment around with the colour correction software and saturation in order to make it look like it had the same effect for the entire movie.

No comments:
Post a Comment